How to completely self-host Standard Notes (Updated 2021)
Introduction
This article will cover setting up your own self-hosted Standard Notes instance and routing your instance through Nginx to allow for public exposure.
We'll also go over self-hosting Standard Notes Extensions to allow you to use extensions within your instance, such as a Markdown editor or secure spreadsheets
What is Standard Notes
Standard Notes is a free, open-source, and completely encrypted notes app. Being open-source, allows anyone to self-host their own Standard Notes server. This means that you own all of your data, on your server.
Standard Notes is great for a secure, private, encrypted note-taking solution. Even without self-hosting, all notes are E2E (end-to-end) encrypted. This means that nobody, other than yourself, can view the notes that you have written.
I have written about Standard Notes in my My Self Hosted Note Syncing Journey Once Switching to iPhone blog post.
Self-hosting Standard Notes is probably for the paranoid and the curious. I was the latter!
It's relatively simple and gives you peace of mind knowing that only you own your data.
Setting up Standard Notes Syncing Server
Step 1: Setting up the syncing server
You'll need to set up a new Linux server. I use a Proxmox instance running on a server in my loft. You could also use something like Digital Ocean to host your Standard Notes Syncing server. Using the following link will give you $100 worth of credits for 60 days to play around with, just sign up using this link.
You could also use a cheap Raspberry PI to set up your own Standard Notes Syncing server.
This new server will need to have Docker and Docker Compose installed.
These can be installed by running the following commands on your server after you have ssh'd to your server
sudo apt-get update
sudo apt-get upgrade
curl -fsSL https://get.docker.com -o get-docker.sh
sudo sh get-docker.sh
sudo curl -L "https://github.com/docker/compose/releases/download/1.28.5/docker-compose-$(uname -s)-$(uname -m)" -o /usr/local/bin/docker-compose
sudo chmod +x /usr/local/bin/docker-compose
Next, you'll need to clone the syncing-server repo down to your home directory.
git clone https://github.com/standardnotes/syncing-server.git
You can now run the server setup.
cd into the syncing-server folder and run the following command
./server.sh setupYou will see the following output
Initializing default configuration
Default configuration files created as .env and docker/*.env files. Feel free to modify values if needed.
Next, let's start the server
./server.sh startAllow the startup script to run and the docker containers to spin up, eventually, you should have an instance running at http://localhost:3000
You can verify this with the following message.
{"message":"Hi! You're not supposed to be here."}Your MySQL Data will be written to your local disk at /var/lib/mysql - Be sure to back this up.
Important! If this didn't work for you, follow these steps instead.
cd into your syncing-server directory.
We need to manually set up a MySQL server to run in a docker container. Firstly, make sure you don't have any of the previous docker containers running.
./server.sh stop
./server.sh cleanup
Next, let's install the MySQL docker server. Run the following command.
docker run --name=mysql1 -d -p 3306:3306 mysql/mysql-server:latestThen run the following and wait until MySQL shows as healthy.
docker psOnce healthy, run the following
docker logs mysql1 2>&1 | grep GENERATEDThis will be the password you need to log into the root user for MySQL
Here's an example output
GENERATED ROOT PASSWORD: Axegh3kAJyDLaRuBemecis&EShOsWe now need to log into the MySQL instance.
docker exec -it mysql1 mysql -uroot -pOnce in, we need to change the default password for the root user. Or, you can save the generated one.
ALTER USER 'root'@'localhost' IDENTIFIED BY 'yournewpassword';Now, we need to configure a new user for Standard Notes and a new Database
Create the database following the .env file in syncing-server
CREATE DATABASE standard_notes_dbCreate the user, this must match the specified username and password in .env
CREATE USER 'std_notes_user'@'%' IDENTIFIED BY 'changeme123';Grant user privileges to the database.
GRANT ALL PRIVILEGES ON standard_notes_db.* TO 'std_notes_user'@'%';That should be all for MySQL, you can exit now by running
exitNow, let's run the Standard Notes docker command.
docker run -d -p 3000:3000 --net host --env-file=.env standardnotes/syncing-serverOnce all spun up, you can verify the endpoint by navigating to localhost:3000
You should see the following message.
{"message":"Hi! You're not supposed to be here."}Step 2: Setting up Nginx
Nginx is a reverse proxy that allows you to point incoming web traffic to your new Standard Notes syncing server. If you only intend on using Standard Notes locally, you can skip this section entirely.
Installation
sudo apt install nginxIf you have UFW installed, you will have to Allow Nginx through your local firewall.
I have a tutorial for setting up UFW here
sudo ufw app list
Output
---
Available applications:
Nginx Full
Nginx HTTP
Nginx HTTPS
OpenSSH
As you can see, there are three profiles available for Nginx:
- Nginx Full: This profile opens both port 80 (normal, unencrypted web traffic) and port 443 (TLS/SSL encrypted traffic)
- Nginx HTTP: This profile opens only port 80 (normal, unencrypted web traffic)
- Nginx HTTPS: This profile opens only port 443 (TLS/SSL encrypted traffic)
It is recommended that you enable the most restrictive profile that will still allow the traffic you’ve configured. Since we haven’t configured SSL for our server yet in this guide, we will only need to allow traffic on port 80.
You can enable this by typing:
sudo ufw allow ‘Nginx HTTP’
Checking your webserver is up and running
sudo systemctl status nginx
You should see something that looks like the following
● nginx.service - A high performance web server and a reverse proxy server
Loaded: loaded (/lib/systemd/system/nginx.service; enabled; vendor preset: enabled)
Active: active (running)
…
Step 3: Pointing Nginx to your syncing server
The next part allows us to take incoming traffic and point it to your container instance. Allowing you to expose your syncing server to the internet.
This will allow you to hook up Standard Notes on any device and sync your notes privately.
If someone gets hold of your public endpoint, your notes will still be safe as they are encrypted with your Standard Notes username and password.
Navigate to /etc/nginx/
cd /etc/nginx/
Use your favourite text editor and open the following file with sudo
sudo vim nginx.conf
I use the following code for my syncing server
server {
listen 80;
listen [::]:80;
server_name notes.theselfhostingblog.com;
location / {
    proxy_pass http://127.0.0.1:3000; # syncing-server address
}
}
Step 4: Port-forwarding
You will need to port forward your instance to allow public access to your instance. This will involve googling how to port forward from your router.
You’ll need to point port 80 to your instance where Nginx is set up.
Step 5: Linking Standard Notes with your public domain
You will also need to set up a public domain name. This can then be used to call your new public instance with port 80 exposed.
For example, I would set up a subdomain on theselfhostingblog.com to be notes.theselfhostingblog.com. Notice this is also the domain I specified in my Nginx config above.
Here’s something to search for with regards to setting up a domain name
Setting up Certbot
Certbot allows us to generate SSL certificates for free with Let’s Encrypt. It’s really really simple to install and use. Even hooks in with Nginx, meaning that there’s no more manual configuration required.
To install Certbot, simply run the following command
sudo apt-get install certbotThen, to set up your SSL certificate, run
sudo certbotFollow the instructions, select your domain name from the Nginx list.
Also select redirect as this will upgrade any HTTP requests to HTTPS.
Step 6: Connecting to your Standard Notes syncing server from Standard Notes
Congratulations on making it this far, now it’s time to hook up Standard Notes with your new private syncing server.
Standard Notes is available on multiple platforms. The easiest way for this tutorial is to use their web interface.
Navigate to https://app.standardnotes.org/
You’ll be greeted with something that looks like the following screenshot
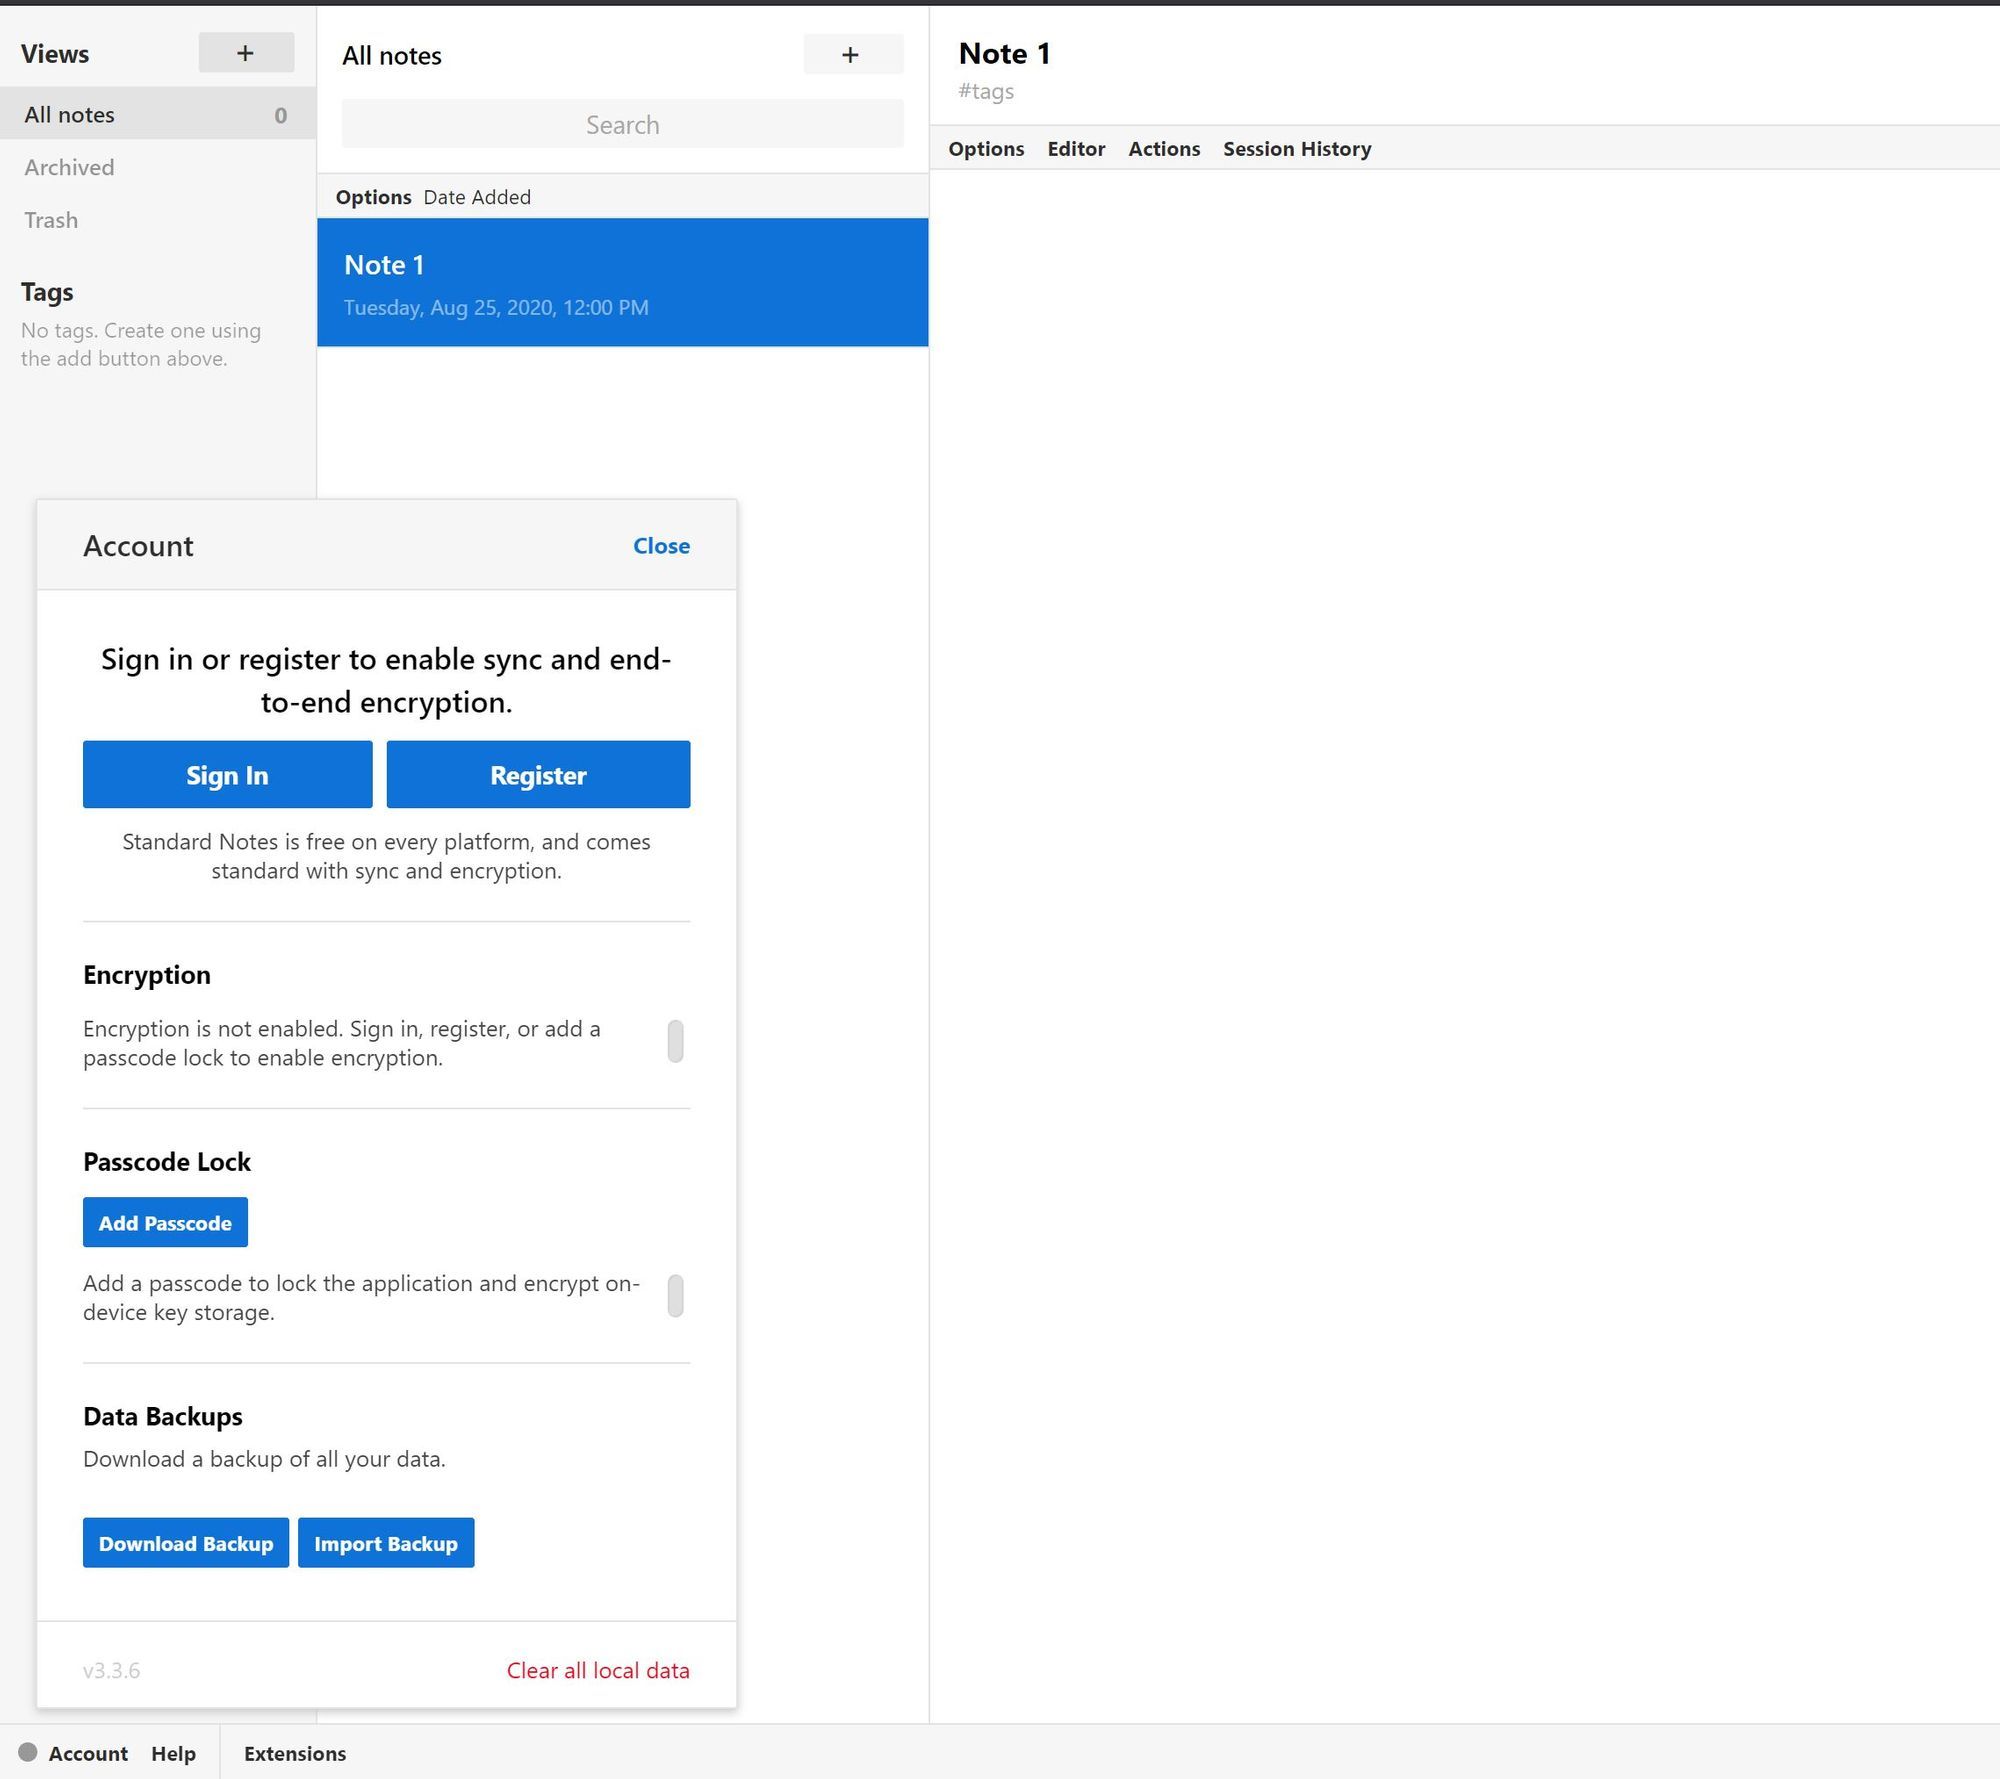
You will need to sign up with a new account as this will be syncing to your server.
Click Register
Before filling out your registration credentials, select Advanced Options

Now fill in your new server URL or IP address.
Then go back to the registration form and enter an Email and Password
Finally, click Register
Easy right? You now have a working self-hosted Standard Notes server.
Setting up self-hosted Standard Notes extensions
Now that you have Standard Notes working, you can add and delete notes at your heart’s desire. But wouldn’t it be cool to also use the Standard Notes Extensions to fully embrace the power of Standard Notes?
You can leave it here, or follow the below process to self-host your extensions too, utilising the power of Markdown editors or Secure Spreadsheets!
Firstly, by self-hosting your extensions, you’re bypassing the need to purchase a license. The Standard Notes team mainly works from a ‘Visionary’ point of view. I heavily encourage you to purchase a license to support the great work that the team are doing. Here’s a quote from the Standard Notes team themselves.
“Most of our extensions are open-source and available for self-hosting. You can also learn to develop your own extensions by following the guides on this site. However, we encourage you to support the sustainability and future development of this project by purchasing a subscription." ~ Sustainability of Standard Notes
If however, you would still like to proceed with hosting your Extensions, then please follow the steps below.
Step 1: Pulling the Standard Notes Extensions Repository
I will be using the Standard Notes Extention repository by iganeshk who has provided their own README.md for setting up Standard Notes Extensions. I’ll be using their instructions in my steps below. All credit for the setup goes to iganeshk
Let’s begin.
Firstly, start by ssh’ing into your new server that we set up in the previous section.
We’ll need to pull down the required repository
git clone https://github.com/iganeshk/standardnotes-extensions.git
cd standardnotes-extensions
Ensure that you have Python3 and pip installed on your server as this is used to install the required dependencies for the extensions repository.
sudo apt-get install -y python3 python3-pip
Then use pip3 to install the required dependencies. You may have to reboot before this command works.
pip3 install -r requirements.txt
Step 2: Configuring the Standard Notes Extensions Repository
You’ll now need to create a .env file to store your environment variables for the repository.
Ensure you’re in the standardnotes-extensions directory
cd ~/standardnotes-extensions
Then create the .env file
touch .env
Then open with your favourite editor
vim .env
Paste in the following example from iganeshk
env.sample
Edit your domain value, and Github username and TOKEN
The Github integration is to allow you to clone down the Standard Notes extensions from the Standard Notes Github page.
# Github Credentials
Generate your token here: https://github.com/settings/tokens
No additional permission required, this is just to avoid github api rate limits

domain: https://domain.com/extensions
github:
username: USERNAME
token: TOKEN
Save and close that file. Ensuring that it is named .env
Step 3: Running Standard Notes Extensions from your server
You’ll now need to execute the service.
This can be done by running the following command.
python3 build_repo.py
This will generate a /public directory, which you will serve.
Step 4: Routing with Nginx
Now, with that static folder generated, we just need to point Nginx to that /public folder to serve the extensions.
As before in the previous section, edit your Nginx config
Navigate to /etc/nginx/
cd /etc/nginx/
Use your favourite text editor and open the following file with sudo
sudo vim nginx.conf
You’ll see your previously added Nginx config for serving the syncing server
server {
listen 80;
listen [::]:80;
server_name notes.theselfhostingblog.com;
location / {
    proxy_pass http://127.0.0.1:3000; # syncing-server address
}
}
Under the server section, you will need to add the following configuration, again taken from iganeshk.
location ^~ /extensions {
autoindex off;
alias /path/to/standardnotes-extensions/public; #CHANGE ME
# CORS HEADERS
if ($request_method = ‘OPTIONS’) {
add_header ‘Access-Control-Allow-Origin’ ‘’;
add_header ‘Access-Control-Allow-Methods’ ‘GET, POST, OPTIONS’;
#
# Custom headers and headers various browsers should be OK with but aren’t
#
add_header ‘Access-Control-Allow-Headers’ ‘DNT,User-Agent,X-Requested-With,If-Modified-Since,Cache-Control,Content-Type,Range’;
#
# Tell client that this pre-flight info is valid for 20 days
#
add_header ‘Access-Control-Max-Age’ 1728000;
add_header ‘Content-Type’ ’text/plain; charset=utf-8’;
add_header ‘Content-Length’ 0;
return 204;
}
if ($request_method = ‘POST’) {
add_header ‘Access-Control-Allow-Origin’ ‘’;
add_header ‘Access-Control-Allow-Methods’ ‘GET, POST, OPTIONS’;
add_header ‘Access-Control-Allow-Headers’ ‘DNT,User-Agent,X-Requested-With,If-Modified-Since,Cache-Control,Content-Type,Range’;
add_header ‘Access-Control-Expose-Headers’ ‘Content-Length,Content-Range’;
}
if ($request_method = ‘GET’) {
add_header ‘Access-Control-Allow-Origin’ ‘*’;
add_header ‘Access-Control-Allow-Methods’ ‘GET, POST, OPTIONS’;
add_header ‘Access-Control-Allow-Headers’ ‘DNT,User-Agent,X-Requested-With,If-Modified-Since,Cache-Control,Content-Type,Range’;
add_header ‘Access-Control-Expose-Headers’ ‘Content-Length,Content-Range’;
}
}
Your nginx.conf should now look like the following
server {
listen 80;
listen [::]:80;
server_name notes.theselfhostingblog.com;
location / {
    proxy_pass http://127.0.0.1:3000; # syncing-server address
}

location ^~ /extensions {
	autoindex off;
	alias /path/to/standardnotes-extensions/public; #CHANGE ME
	# CORS HEADERS
	if ($request_method = 'OPTIONS') {
	   add_header 'Access-Control-Allow-Origin' '*';
	   add_header 'Access-Control-Allow-Methods' 'GET, POST, OPTIONS';
	   #
	   # Custom headers and headers various browsers *should* be OK with but aren't
	   #
	   add_header 'Access-Control-Allow-Headers' 'DNT,User-Agent,X-Requested-With,If-Modified-Since,Cache-Control,Content-Type,Range';
	   #
	   # Tell client that this pre-flight info is valid for 20 days
	   #
	   add_header 'Access-Control-Max-Age' 1728000;
	   add_header 'Content-Type' 'text/plain; charset=utf-8';
	   add_header 'Content-Length' 0;
	   return 204;
	}
	if ($request_method = 'POST') {
	   add_header 'Access-Control-Allow-Origin' '*';
	   add_header 'Access-Control-Allow-Methods' 'GET, POST, OPTIONS';
	   add_header 'Access-Control-Allow-Headers' 'DNT,User-Agent,X-Requested-With,If-Modified-Since,Cache-Control,Content-Type,Range';
	   add_header 'Access-Control-Expose-Headers' 'Content-Length,Content-Range';
	}
	if ($request_method = 'GET') {
	   add_header 'Access-Control-Allow-Origin' '*';
	   add_header 'Access-Control-Allow-Methods' 'GET, POST, OPTIONS';
	   add_header 'Access-Control-Allow-Headers' 'DNT,User-Agent,X-Requested-With,If-Modified-Since,Cache-Control,Content-Type,Range';
	   add_header 'Access-Control-Expose-Headers' 'Content-Length,Content-Range';
	}
}
}
Make sure you change the alias to point to your public folder. Remember, this is in the /home/your-user/standardnotes-extensions/public location.
For me, it would be
alias /home/ubuntu/standardnotes-extensions/public
Close and save the nginx.conf
That’s it for config.
The last thing you’ll need to do in terms of setup is to verify the endpoint.
Step 5: Verifying the Standard Notes Extensions endpoint
Navigate to your previous URL and add extensions/index.json to the end of the URL.
For example
http://notes.theselfhostingblog.com/extensions/index.json
You should see a list of JSON objects.
If, you don’t see the endpoint correctly, ensure that the /public folder has the correct permissions from Nginx to read the files.
Step 6: Adding Extensions to Standard Notes
Nearly there. We just need to add our new endpoint to our existing Standard Notes client.
Navigate back to https://app.standardnotes.org and log in as we did before.
In the bottom corner, select Extensions

You’ll see a field that reads Enter Extended Code this is where you’ll usually paste your Extensions API Key. But all you need to do is paste your new extensions URL.
Then hit Submit Code
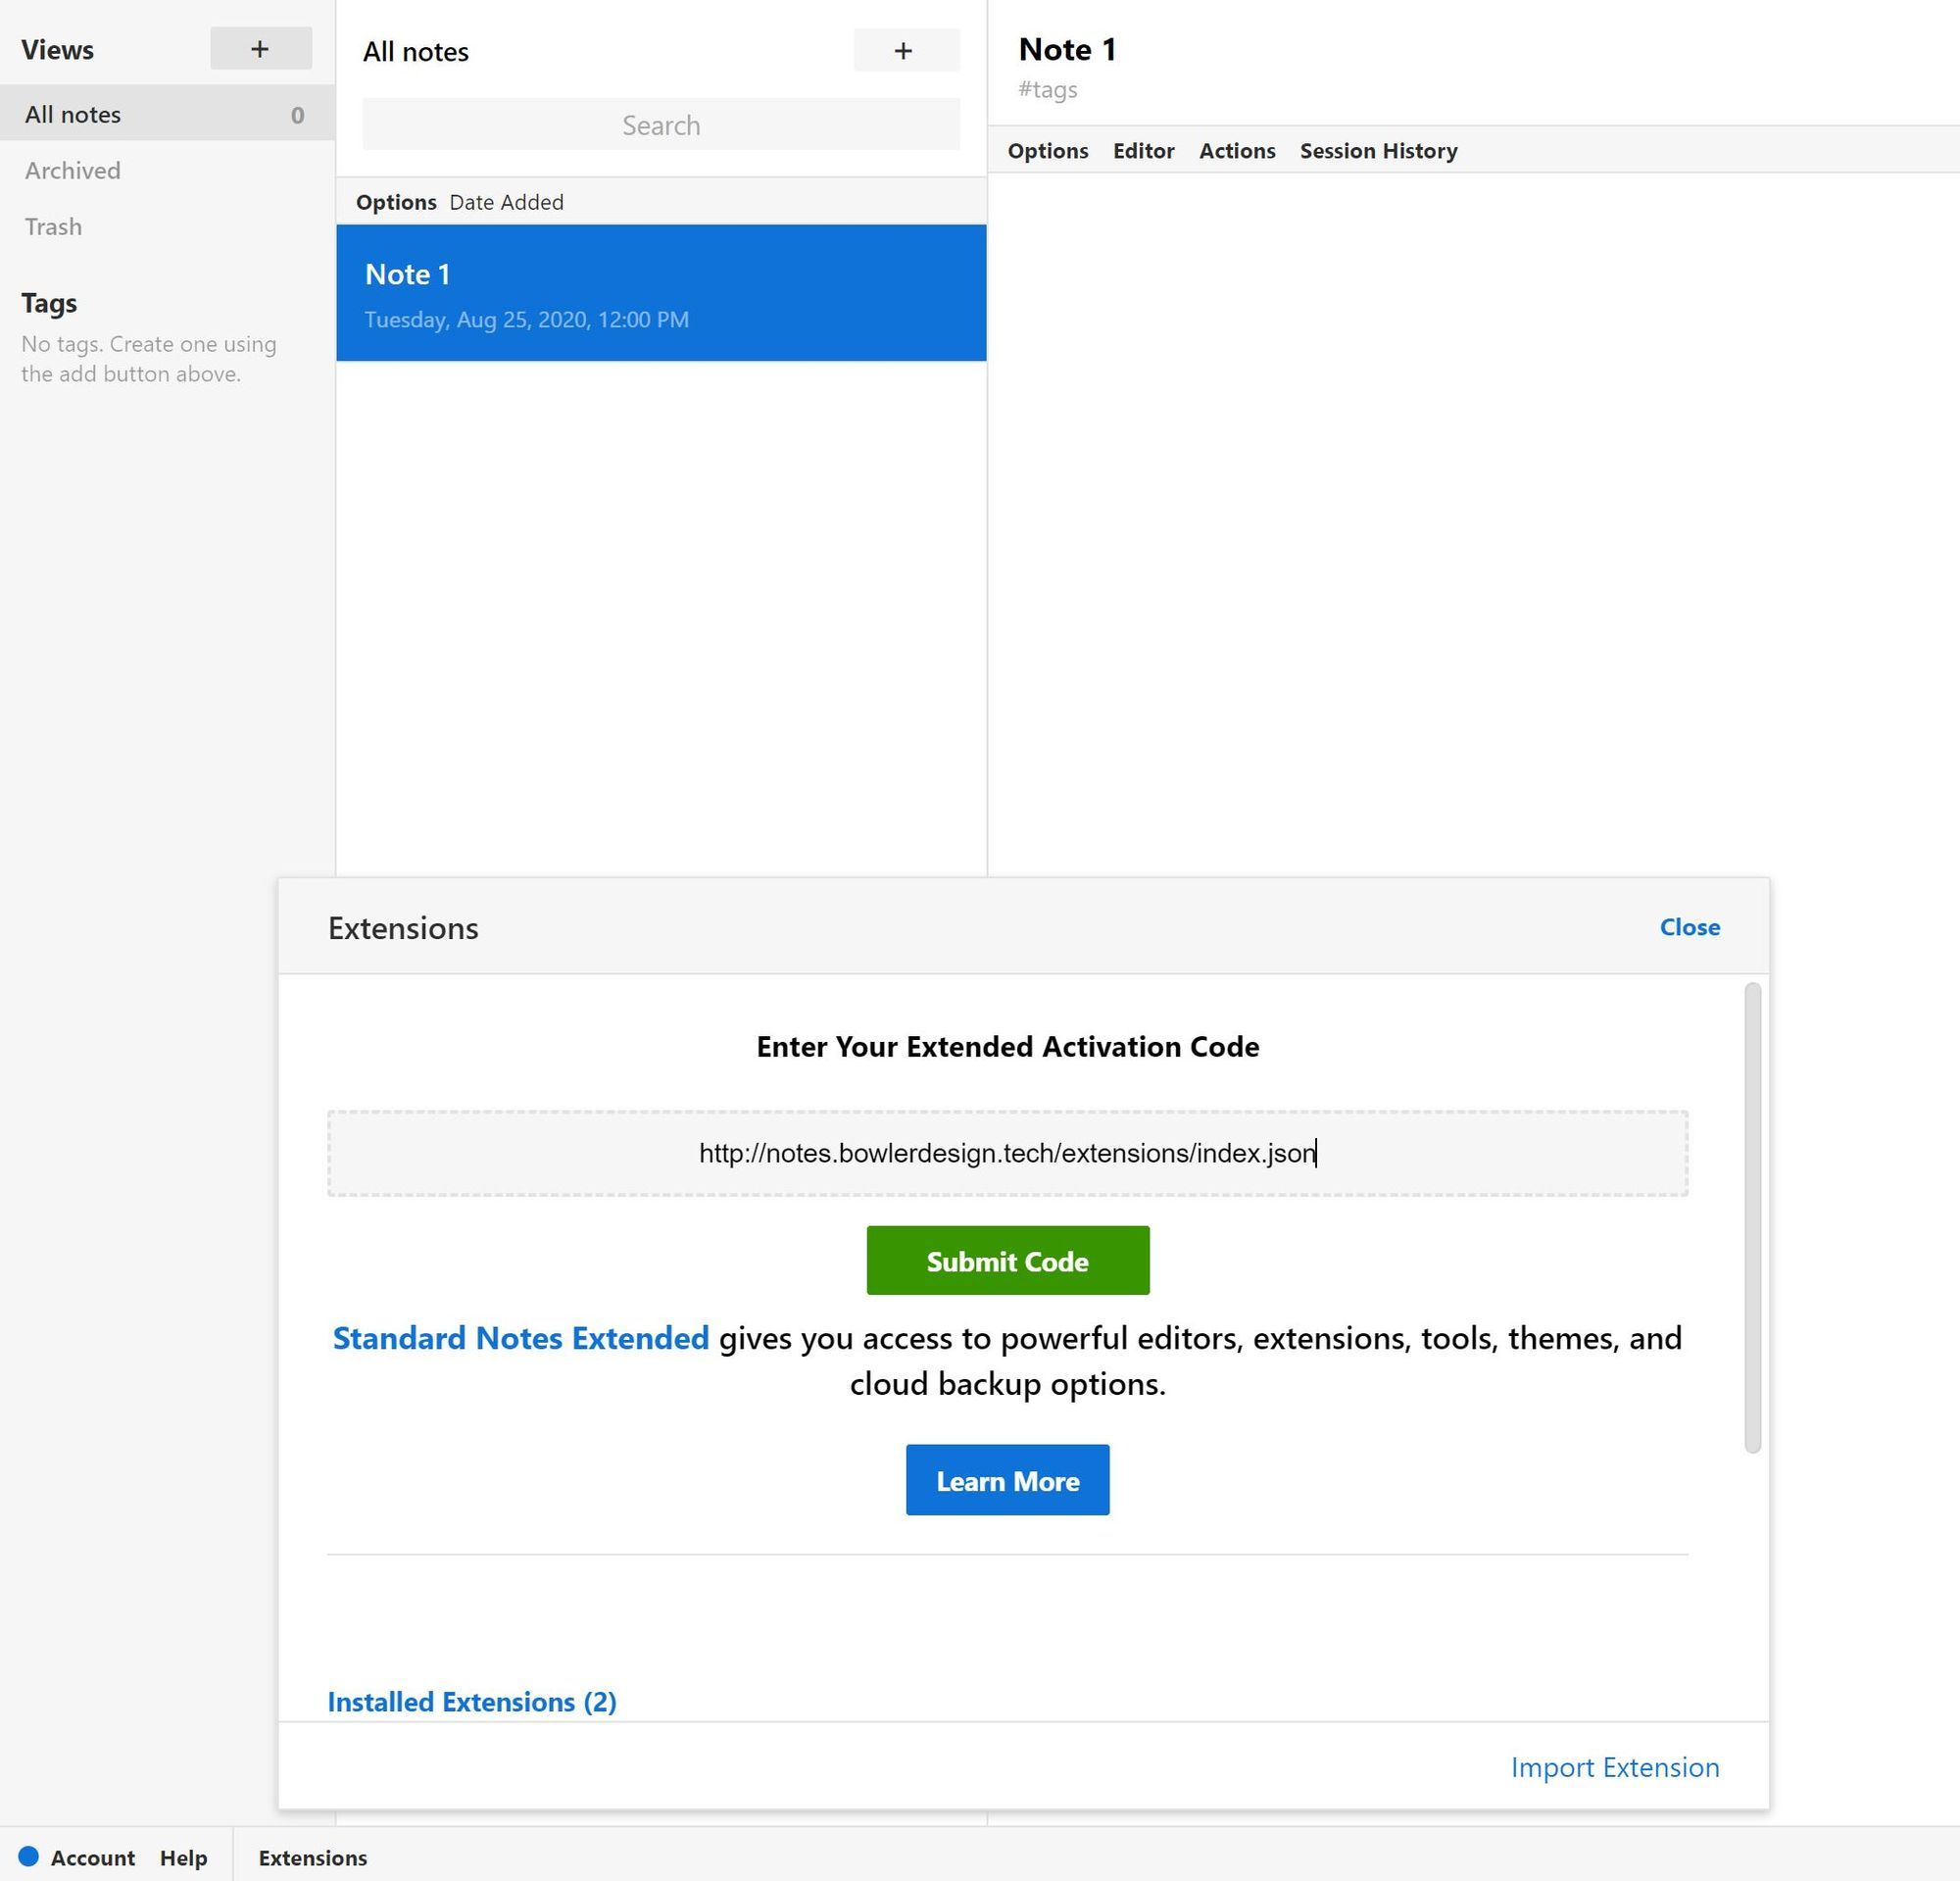
And, we’re done
That’s it, providing everything worked, you should now be able to add extensions to your Standard Notes instance.
Now, this process is complicated, so please don’t hesitate to get in touch in the comments if you get stuck. I’d be more than happy to help out with any issues you may face.
Thanks for reading, please donate to Standard Notes as, without them, none of this would be possible.